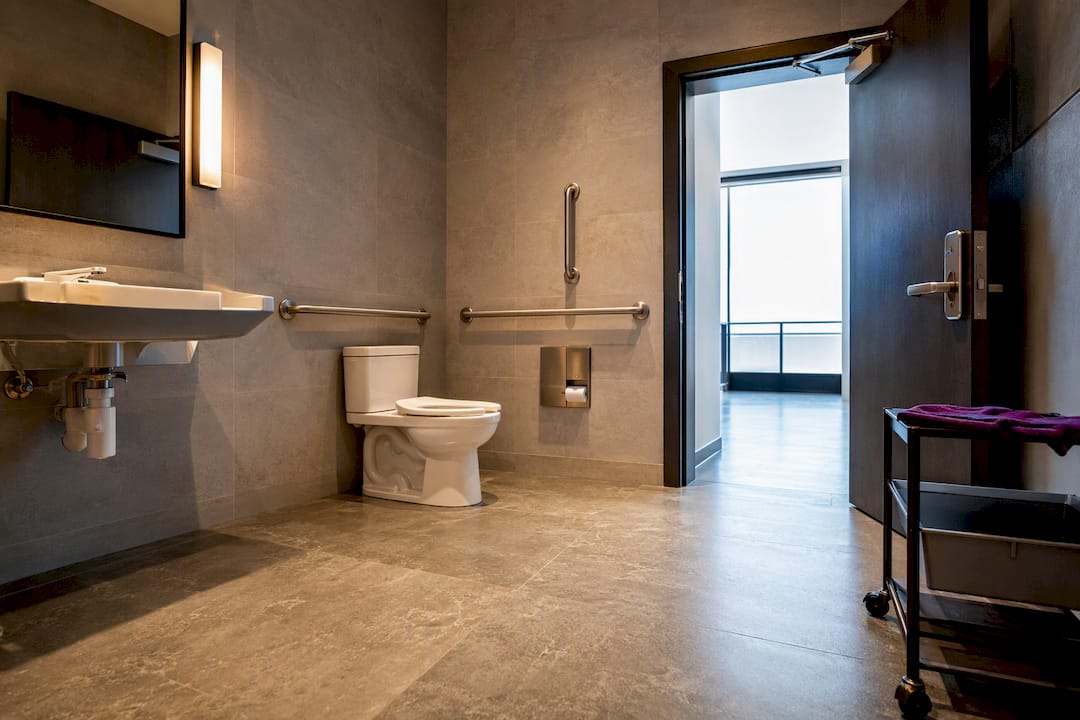
Use the 2010 ADA Standards as your federal baseline: they remain fully in force for 2026 with no wholesale rewrite, so prioritize the 60-inch turning space, correct wheelchair stall clearances, proper grab-bar heights, and the alterations path-of-travel cost cap. Get the toilet centerline right, hit the 17 to 19-inch seat height, and confirm your local code edition before submittals. Miss any one of these and you’re looking at rework, not a warning.
TL;DR:
- The 2010 ADA Standards remain the standard for 2026, emphasizing precise measurements such as a 60-inch turning space and 17 to 19-inch toilet seats, with local codes adding layers of requirements.
- Typical inspection failures stem from minor dimension deviations like half-inch inaccuracies in grab bar height or stall clearance, making pre-installation cross-checking critical.
- Accurate plan citing specific ADA standards, including clearances, stall depths, and sign placements, expedites review and reduces field rework due to non-compliance.
- In alterations, the path-of-travel obligation is capped at 20% of the total project cost, requiring prioritization of key elements like turning space and accessible stall construction.
- Ongoing compliance relies on annual inspections and maintenance checks of fixture heights, signage, and clearances, with digital and acoustic accessibility considerations expanding beyond basic mobility requirements.
Table of Contents
- What Are the ADA Restroom Requirements for 2026?
- What Are the Exact Dimensions and ADA Sections to Cite on Plans?
- When Do ADA Restroom Requirements Apply to Your Project?
- What Fixture-by-Fixture Rules Cause the Most Inspection Failures?
- Single-User vs. Multi-User Layouts: When Do Ambulatory Stalls Kick In?
- What Should You Spec for Temporary and Portable Restroom Compliance?
- Field Mistakes That Cause Rework, and How to Avoid Them
- How Do Inspectors Check ADA Restroom Compliance?
- What Changed in the 2026 ADA Standards?
- Beyond Mobility: Designing for Visual and Cognitive Accessibility
- How Do You Keep a Restroom Compliant After Construction?
- How Are Sensors and Automation Changing ADA Restroom Design?
- How Do State and Local Codes Interact With Federal ADA Rules?
- Where to Verify ADA Restroom Requirements
- A Contractor’s Take on Building Accessibility in Early
- How Axenia Construction Handles ADA Restroom Compliance
- Sources
- FAQ
What Are the ADA Restroom Requirements for 2026?
Nothing about the core federal rulebook changed heading into 2026. The 2010 ADA Standards for Accessible Design still govern every commercial and public restroom project in the country, and the U.S. Access Board hasn’t issued a superseding restroom rule since then. What’s changed is enforcement pressure and how aggressively local jurisdictions layer their own code editions on top of that federal floor.
For contractors, that means 2026 compliance is really about precision, not new law. You’re working from the same numbers your predecessors used a decade ago: a 60-inch turning space, stall widths and depths that vary by mounting type, grab bars set between 33 and 36 inches, and toilet centerlines pinned to a tight range. Where projects fail inspection isn’t usually a misunderstanding of the rule. It’s a half-inch here, a missed clearance there, or a subcontractor who installed the toilet paper dispenser where it blocks the transfer space.
Here’s the checklist version you’ll actually use on a jobsite.
- Turning space: 60-inch diameter circle or T-shaped equivalent, unobstructed
- Wheelchair stall width: 60 inches minimum
- Stall depth: 56 inches for wall-hung toilets, 59 inches for floor-mounted units
- Toilet seat height: 17 to 19 inches above the finished floor
- Grab bar height: 33 to 36 inches, measured to the top of the gripping surface
- Lavatory clearance: 27 inches minimum knee clearance, rim no higher than 34 inches
- Cluster rule: at least 50% of single-user rooms in a cluster must be accessible
That half-inch tolerance on grab bars sounds trivial until an inspector fails your final walk because the contractor read “34 inches” off an old cut sheet instead of the current 33 to 36-inch band. It happens more than most crews want to admit.
Before your subs pour a single anchor, cross-check every rough-in dimension against the Access Board’s toilet-room guidance, which walks through exactly how these clearances interact in real room layouts. A plan review focused on ADA compliance at the design stage catches most of these conflicts before they become field problems.
What Are the Exact Dimensions and ADA Sections to Cite on Plans?
Plans that cite specific ADA Standard sections move through review faster, and they leave inspectors nothing to argue with. Here’s what belongs on your drawings, fixture schedules, and rough-in details.
Turning space and door swing
Every accessible toilet room needs a clear floor space that lets a wheelchair user complete a full turn. The Standards allow either a 60-inch diameter circle or a T-shaped space with specific arm dimensions, and doors may swing into that turning space under defined conditions rather than forcing you to carve out extra square footage. That flexibility matters most in tight tenant buildouts where every additional foot of room costs leasable area.
Water closet clearance and centerline
This is where most rough-in plumbing goes wrong. ADA Standard 604.3 covers the clear floor space around the toilet, and 604.5 governs grab bar placement relative to that fixture. The wheelchair-accessible centerline sits 16 to 18 inches from the side wall, while ambulatory-accessible stalls use a 17 to 19-inch range. Some overlap between these zones is permitted, but plumbers who eyeball the centerline instead of measuring off the finished wall consistently land an inch outside tolerance.
Stall depth by mounting type
| Fixture type | Minimum stall depth | Why it matters |
|---|---|---|
| Wall-hung toilet | 56 inches | Bowl sits forward of the wall, recovering depth |
| Floor-mounted toilet | 59 inches | Tank and base consume more of the compartment |
That three-inch difference decides whether a cramped compartment against a structural wall passes or fails. Specifying wall-hung fixtures early, rather than discovering the shortfall at framing, is one of the cheapest decisions a design team makes on a tenant improvement.
Grab bars, backing, and dispenser overlap
Grab bars mount between 33 and 36 inches above the floor, measured to the top of the gripping surface, and the rear bar must run at least 36 inches long with the side bar extending 42 inches. Every bar needs solid blocking behind the wall finish, rated to resist a 250-pound force applied in any direction. Toilet paper dispensers can overlap the grab bar zone, but only if they don’t obstruct the required grip surface or force a user’s hand into an awkward angle to reach them.
Lavatory and counter height
The lavatory rim can’t exceed 34 inches above the floor, and you need at least 27 inches of clear knee space underneath, extending to 30 inches at the widest point. Toe clearance beneath the cabinet or apron must reach 9 inches high and 6 inches deep at minimum. Faucet controls need to operate with one closed fist, meaning lever handles or sensor-activated fixtures, and pipes underneath must be insulated or otherwise protected against contact.
- Knee clearance: 27 inches minimum height, 30 inches at 8 inches back from the front edge
- Toe clearance: 9 inches high, 6 inches deep minimum
- Counter height: 34 inches maximum to the rim
- Operable parts: maximum 5 pounds of force, lever or sensor-based controls
Pro Tip: Set your counter spec at 33½ inches instead of chasing the 34-inch maximum exactly. That half-inch buffer absorbs tile thickness variation and keeps you compliant even if the finish floor build-up shifts during construction.
When Do ADA Restroom Requirements Apply to Your Project?
Scoping determines whether the rules apply at all, and getting this wrong either costs you an unnecessary renovation or exposes you to a complaint down the road.
New construction has no wiggle room. Every toilet room in a new commercial building must be accessible under Title III, and government facilities carry the same obligation under Title II. There’s no square-footage exemption and no “we’ll fix it later” clause once the certificate of occupancy is on file.
Alterations work differently, and this is where most disputes start. If you’re altering a primary function area, whether that’s a retail sales floor, an office suite, or a restaurant dining room, you also have to make the path of travel to that area accessible, including the restrooms serving it. The catch is the cost cap: your path-of-travel obligation is capped at a fifth of the total cost of the alteration itself.
Here’s how that math works in practice. A $200,000 tenant buildout triggers a maximum $40,000 path-of-travel obligation. If bringing the nearest restroom into compliance costs $25,000, you do it in full. If full compliance would run $60,000, you’re only required to spend the $40,000 cap, prioritized toward the elements that give users the most access.
- Calculate the 20% figure off the alteration contract value, not the building’s overall renovation budget
- Prioritize turning space, door clearance, and one accessible stall before spending the cap on secondary items like signage
- Document your prioritization decisions in case an AHJ or DOJ complaint ever questions the sequence
Clustered single-user rooms
When a building groups multiple single-user toilet rooms together, such as a food hall or an office floor with several small restrooms, the Standards allow a cluster exception: only 50% of those rooms need to be fully accessible, though portable or temporary clusters carry a separate 5% minimum. Whichever rooms aren’t accessible must be clearly marked, and every accessible one needs the International Symbol of Accessibility on the door.
Local code layers on top
The federal Standards set the floor, not the ceiling. Most jurisdictions adopt the IBC alongside ANSI A117.1, and local amendments sometimes tighten dimensions or add requirements the federal rule doesn’t mention. Code coordination between these layers needs to happen at the permit-set stage, not after your subs have already ordered fixtures based on the federal minimum alone.
What Fixture-by-Fixture Rules Cause the Most Inspection Failures?
Every fixture category has its own failure pattern, and most of them are predictable once you’ve seen a few.
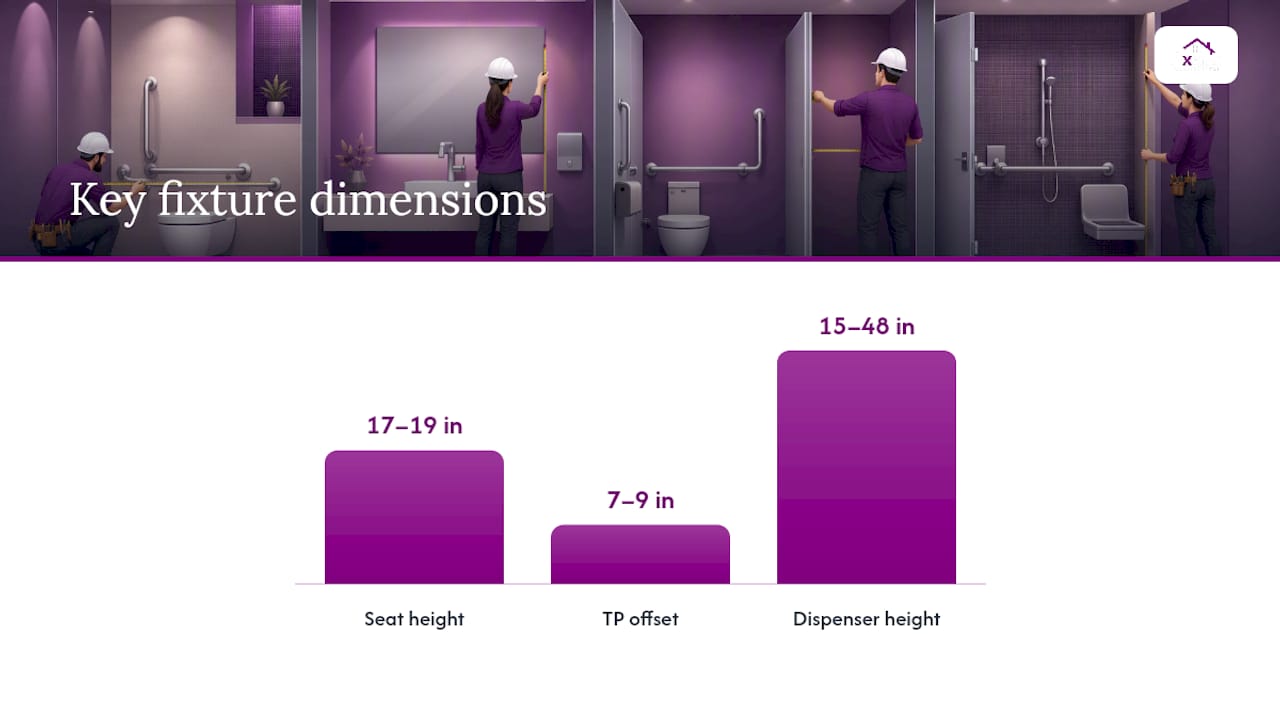
Toilets fail inspection most often on seat height. The 17 to 19-inch range gets measured from the finished floor to the top of the seat, not the bowl rim, and installers who don’t account for a thicker seat or a raised wax ring frequently land outside the band. Toilet paper dispensers must sit within 7 to 9 inches of the front of the toilet and between 15 and 48 inches off the floor, positioned so they don’t block the grab bar or the transfer path.
Urinals, where provided, require at least one accessible unit per bank when multiple urinals are installed, with the rim no higher than 17 inches and flush controls mounted no higher than 44 inches, operable with one hand and without tight grasping.
Lavatories fail most often on knee clearance, usually because a cabinet apron or P-trap intrudes into the 27-inch minimum. Faucet handles that require twisting or pinching don’t meet the operable-parts rule, even if the sink height and clearance are perfect. Exposed hot water and drain pipes need insulation or a protective panel; a bare trap under an otherwise compliant sink is still a fail.
Accessories and signage round out the list. Dispensers, soap pumps, and hand dryers need their operable controls within a 15 to 48-inch reach range depending on approach (forward or side), mirrors need a bottom edge no higher than 40 inches, and tactile signage identifying accessible rooms mounts between 48 and 60 inches to the centerline of the sign, on the wall adjacent to the door on the latch side.
- Measure toilet seat height after the fixture is fully set, not off the spec sheet alone
- Verify carrier backing before closing walls, since wall-hung toilets can’t be adjusted after drywall
- Confirm faucet and flush controls operate with a closed fist, not just visually check the handle style
- Check tactile sign placement against the actual door swing, since some layouts put the latch side on the hinge wall in mirrored units
Pro Tip: Photograph every rough-in measurement before you close the wall. A ten-second phone photo with a tape measure in frame saves you from tearing out finished tile when an inspector questions a dimension you can no longer see.
Single-User vs. Multi-User Layouts: When Do Ambulatory Stalls Kick In?
A toilet compartment inside a shared multi-user restroom is scoped differently than a standalone single-user toilet room, and the distinction changes your fixture count math. A compartment is one stall among several in a shared space; a single-user room is its own enclosed restroom with a lockable door, typically serving one occupant at a time.
The trigger most contractors miss involves fixture count. Once a multi-user restroom includes six or more toilet fixtures (combining water closets and urinals), you need at least one ambulatory-accessible compartment in addition to the standard wheelchair-accessible stall. Ambulatory stalls run narrower, between 35 and 37 inches wide, but require grab bars on both side walls rather than just one, since they’re designed for someone using crutches or a walker rather than a wheelchair.
- Count every water closet and urinal in the room toward the six-fixture threshold
- Provide grab bars on both sides of an ambulatory stall, not just the rear wall
- Locate the ambulatory stall adjacent to the wheelchair-accessible stall where the layout allows it
Unisex or family restrooms can substitute for full multi-user accessibility in some layouts, particularly in mixed-use buildings or where space constraints make a fully compliant multi-user room impractical. That substitution works best as a supplement to standard restrooms, not a replacement for them, and it doesn’t excuse you from the cluster rules if you’re dealing with multiple single-user rooms elsewhere in the building.
What Should You Spec for Temporary and Portable Restroom Compliance?
Jobsite and event restrooms get overlooked until a public-facing project draws a complaint, and by then the fix is expensive and embarrassing. The same cluster math applies here: at least 5% of a portable restroom cluster must be wheelchair accessible, and those units need the International Symbol of Accessibility clearly posted.
For any project with public foot traffic, whether that’s a streetscape build, a public event, or a long-duration commercial job with visitor access, restroom trailers generally outperform retrofitted portable units on accessibility because they’re built with the turning space and grab bar placement engineered in, rather than bolted onto a standard unit after the fact.
Before any vendor delivers to your site, run this checklist:
- Confirm interior turning space meets the 60-inch standard, not just the exterior footprint
- Check ramp slope on any accessible unit; steep temporary ramps are a common shortcut vendors take
- Verify grab bar placement and height match the 33 to 36-inch standard, not a generic “accessible” label
- Test operable parts (door latches, flush mechanisms) for one-hand, no-grasp operation
- Get the vendor’s ADA compliance claim in writing before delivery, and verify it against the actual unit on arrival
Pro Tip: Don’t trust a rental vendor’s “ADA compliant” label on a spec sheet. Walk the actual unit with a tape measure before it goes on your site, especially for long-duration projects where a failed unit means a mid-job swap and a schedule hit.
Field Mistakes That Cause Rework, and How to Avoid Them
The single most expensive mistake we see in the field is the toe-gap problem. Accessible stalls need a clear gap at the bottom of the compartment wall, generally about nine inches high, so a wheelchair footrest can pass underneath. Framing crews working against a concrete block or structural wall often discover too late that creating that gap isn’t possible without moving the entire fixture run, which means replumbing rather than adjusting a partition.
The fix is sequencing, not a better partition system. Confirm toe-gap feasibility against your actual wall assembly during the framing review, before rough-in plumbing sets fixture locations in concrete, literally. If a structural wall won’t allow the gap, plan to shift the stall or switch to a wall-hung toilet that recovers depth elsewhere in the compartment.
Build tolerance into your specs rather than chasing the maximum. Setting counters at 33½ inches instead of exactly 34 absorbs finish variation. Specifying wall-hung toilets where the budget allows buys you three inches of stall depth you’d otherwise have to find in the framing plan.
- Verify toe-gap feasibility against wall type during framing review, not after drywall
- Set counters at 33½ inches, not the 34-inch ceiling, to absorb tile and build-up variation
- Photograph and log every rough-in dimension before closing walls
- Hold a pre-close inspection specifically for ADA dimensions, separate from your standard rough-in walk
Pro Tip: Add an ADA-specific hold point to your schedule right before wall closure, separate from the general rough-in inspection. It takes twenty minutes and catches problems that cost weeks to fix later.
A quick-fix accessory swap, new grab bars, a lower dispenser, runs a few hundred dollars. A layout remodel to fix a stall that’s three inches too narrow can run into five figures once you account for plumbing relocation and finish repair. When a facility has multiple non-compliant restrooms, staged upgrades, tackling the highest-traffic room first, spread that cost without leaving the whole building exposed at once. A bathroom remodel handled with accessibility built into the plan from day one avoids that math entirely.
How Do Inspectors Check ADA Restroom Compliance?
Inspectors work from a short list of high-failure items, and knowing that list lets you pre-check before they ever walk the site. Turning space gets measured first, since it’s the easiest violation to spot with a tape measure. Grab bar height and length come next, followed by lavatory knee clearance and faucet operability. Signage, both the tactile room identification and any directional signage required when not every single-user room is accessible, rounds out the standard walk.
Documentation matters as much as the physical install. Keep shop drawings that show ADA dimensions explicitly, field verification reports from your own pre-close inspections, and dated photos of rough-in measurements before walls closed. That paper trail turns a disputed inspection into a five-minute conversation instead of a stop-work order.
- Pre-check turning space, grab bar height, and lavatory clearance before scheduling final inspection
- Confirm tactile signage mounting height (48 to 60 inches to centerline) and door-side placement
- Keep a compliance file per restroom: shop drawings, field photos, submittal approvals
- Address any AHJ-flagged item through a documented, “readily achievable” correction plan rather than an informal fix
Working with the AHJ early, rather than waiting for a failed final, is the difference between a quick punch-list item and a stop-work order that costs you a week of schedule.
What Changed in the 2026 ADA Standards?
The core answer surprises a lot of contractors: the 2010 ADA Standards haven’t been replaced heading into 2026. There’s no new numbered edition superseding the dimensional requirements you’ve been building to for over a decade. What’s shifted is emphasis and enforcement, not the underlying rulebook.
DOJ enforcement activity and private litigation around digital and physical accessibility have both increased, which pushes more building owners toward proactive compliance rather than reactive fixes after a complaint. Local jurisdictions have also been more aggressive about updating their IBC and ANSI A117.1 adoption cycles, which means the federal floor stays fixed while the local ceiling keeps moving. A restroom that met code in 2019 under an older local amendment might not meet the 2026 adopted edition in the same county, even though the federal ADA Standard behind it never changed.
The practical takeaway for 2026 planning is to treat the federal Standards as stable and verify your local code edition fresh on every project. Don’t assume last year’s permit set reflects this year’s adopted amendments, especially in jurisdictions that update on a three-year cycle tied to the IBC.
Beyond Mobility: Designing for Visual and Cognitive Accessibility
Most restroom compliance conversations focus on wheelchair clearances, but the Standards, and good design practice, cover a wider range of disabilities. Tactile signage with raised characters and Braille serves people with visual impairments, and that signage needs consistent, predictable placement (48 to 60 inches, latch side of the door) so someone navigating by touch can find it without guessing room to room.
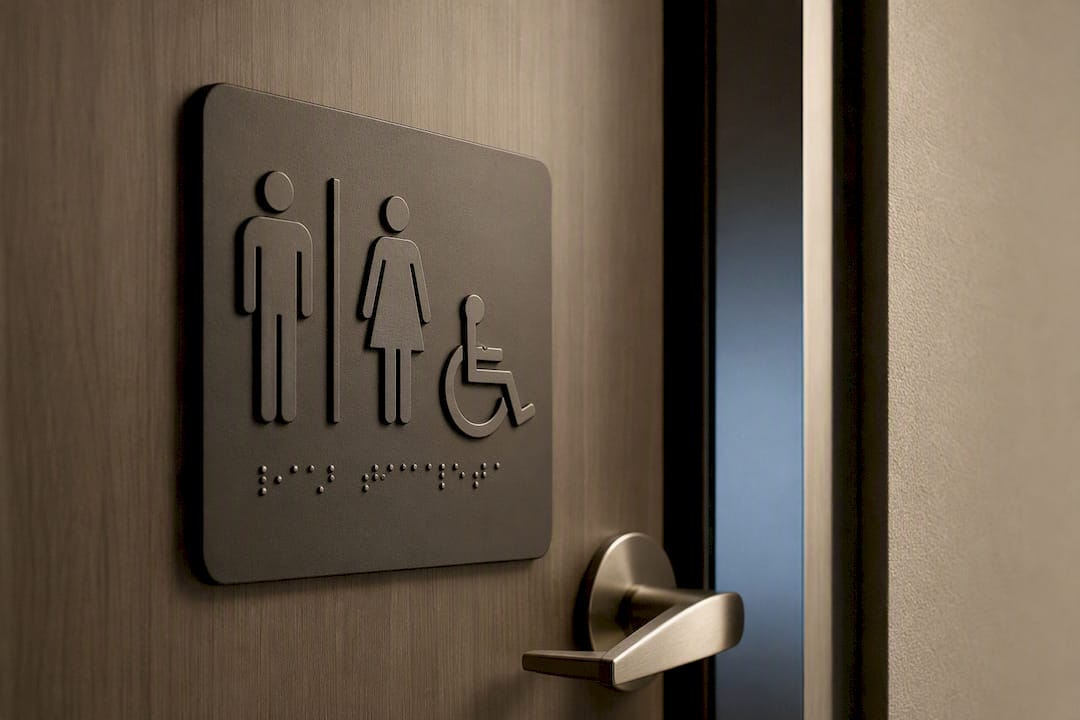
High-contrast visual signage, clear pictograms, and consistent color coding between men’s, women’s, and accessible rooms help people with cognitive disabilities or cognitive processing differences navigate without relying on text alone. Lever-style or sensor-activated fixtures reduce the fine-motor demand that twist-style faucets and small flush handles impose, which benefits people with limited hand strength or dexterity regardless of whether they use a wheelchair.
Acoustic considerations matter more than most specs acknowledge. Hard-surfaced, echo-heavy restrooms are disorienting for people with auditory processing differences or visual impairments who rely on sound cues to navigate. Sound-dampening ceiling tile or wall panels, where the budget allows, is a low-cost addition that improves the space for a broader range of occupants than the dimensional code alone requires. None of this is mandated line-by-line the way turning space is, but building it in during design costs little and closes gaps the numeric Standards don’t fully address.
How Do You Keep a Restroom Compliant After Construction?
Compliance isn’t a one-time inspection milestone. Grab bars loosen, dispensers get remounted in the wrong spot during a maintenance call, and a “temporary” storage cart parked in the turning space for six months becomes a permanent obstruction nobody flags.
Facility managers should run an annual accessibility walk-through using the same checklist your inspector used at final: turning space clear of storage or equipment, grab bars still torqued to spec, signage intact and legible, dispensers within reach range. Any maintenance work that touches a restroom, a plumbing repair, a repaint, a fixture swap, should trigger a quick re-check against the original dimensions before the crew leaves, since it’s common for a well-meaning repair to shift a fixture half an inch out of tolerance.
- Schedule an annual ADA walk-through as part of standard facility maintenance, not a separate compliance program
- Re-verify dimensions any time maintenance touches a restroom fixture, signage, or partition
- Keep the original compliance documentation on file so future maintenance staff know the target dimensions
- Treat furniture, cleaning equipment, and signage placement as an ongoing housekeeping issue, not a one-time install detail
Building owners who treat this as routine facility upkeep, rather than a box checked once at occupancy, avoid the slow drift that turns a compliant restroom into a liability years later.
How Are Sensors and Automation Changing ADA Restroom Design?
Touchless fixtures have become close to standard in new commercial construction, and they solve two problems at once: hygiene and operable-parts compliance. A sensor-activated faucet, soap dispenser, or flush valve automatically satisfies the “operable with one hand, without tight grasping” requirement, since there’s no grip or twist motion involved at all.
Automatic door operators help too, particularly on single-user rooms where a heavy door and a tight turning space combine to make manual operation difficult for a wheelchair user. Motion-sensor lighting reduces the reach-range problem entirely by removing the light switch as an accessibility variable.
None of this technology is required by the 2010 Standards, which were written in fixture-neutral language specifying force and reach limits rather than mandating sensors. But automated fixtures make compliance easier to achieve and easier to maintain over time, since there’s no handle height to drift out of tolerance. For contractors pricing out a restroom remodel, sensor-based fixtures often cost more upfront but reduce the ongoing risk of a maintenance-caused compliance failure, which is worth factoring into a total cost comparison rather than judging purely on unit price.
How Do State and Local Codes Interact With Federal ADA Rules?
The federal ADA Standards set a floor that applies everywhere in the country, but they don’t override stricter state or local requirements. Most states adopt the IBC on a rolling cycle and pair it with ANSI A117.1 for accessibility specifics, and local jurisdictions frequently add amendments on top of both.
This creates real variation project to project. A restroom design that clears the federal Standards with room to spare might still fail a local plan review if the jurisdiction’s adopted IBC edition specifies a slightly different clearance or an added fixture count trigger. Coordinating federal, state, and local requirements early in design, rather than assuming the ADA Standard alone covers you, prevents a redesign after permit submittal.
The practical move is simple: pull your jurisdiction’s currently adopted IBC and ANSI A117.1 edition before finalizing restroom layouts, not after your permit set is drawn. Code cycles in Maryland, DC, and Virginia don’t always match, and a project spanning county lines can hit different adopted editions depending on which side of a border it sits on.
Where to Verify ADA Restroom Requirements
Every dimension in this guide traces back to sources you should keep bookmarked for your own plan reviews and submittals.
- ADA Standards for Accessible Design — the full federal text, current baseline for scoping and technical provisions
- U.S. Access Board, Chapter 6: Toilet Rooms — detailed figures and clarifications on clearances and compartment sizing
- Your jurisdiction’s adopted IBC and ANSI A117.1 edition, available through your local permitting office
- A commercial ADA compliance review for project-specific plan checking before permit submittal
A Contractor’s Take on Building Accessibility in Early
The projects that go sideways on ADA compliance almost never fail because someone didn’t know the rules. They fail because accessibility got treated as a punch-list item instead of a framing decision. We’ve seen a stall toe-gap discovered during rough-in inspection turn into a full plumbing relocation, simply because nobody checked wall type against fixture placement before the slab was poured. That’s not a code problem. That’s a sequencing problem, and it’s entirely avoidable.
The business case here is straightforward: every dollar spent verifying dimensions during design costs a fraction of what the same fix costs after walls close. Accessibility done right at the framing stage isn’t a compliance tax. It’s schedule insurance.
— Arienne
How Axenia Construction Handles ADA Restroom Compliance
Getting restroom dimensions right on paper is one thing. Getting them right through framing, rough-in, and final inspection without a change order is what actually saves your budget. Axeniaconstruction builds ADA verification into the same design-build process we use for tenant buildouts and commercial renovations across Maryland, DC, and Northern Virginia, so compliance isn’t a separate step bolted onto your schedule.
A plan review covers scope against the current federal Standards and your jurisdiction’s adopted code edition, a dimensional check on turning space, stall clearances, and grab bar placement before framing locks anything in, and a remediation estimate if an existing restroom needs updating. Whether you’re managing a tenant improvement with a path-of-travel obligation or a ground-up commercial build, our design-build service keeps ADA checks tied to the same team handling your permits and construction schedule, rather than treated as a separate compliance consultant’s job. If you’re weighing a tenant buildout that will trigger restroom upgrades, start with our tenant buildout services team for a scope review before you finalize your lease improvements. Reach out through our general contracting page to get a project-specific compliance estimate started.
Sources
- ADA Standards for Accessible Design
- U.S. Access Board — Chapter 6: Toilet rooms
- Bobrick — ADA bathroom requirements
FAQ
What Are the 2026 ADA Bathroom Requirements?
The 2026 requirements are the same 2010 ADA Standards that have applied since 2010: a 60-inch turning space, wheelchair stall clearances of 56 inches (wall-hung) or 59 inches (floor-mounted), grab bars at 33 to 36 inches, and toilet seat heights of 17 to 19 inches. No new federal edition took effect in 2026.
What Are the ADA Requirements for Commercial Restrooms?
Commercial restrooms must provide a 60-inch turning space, at least one wheelchair-accessible stall meeting the width and depth minimums, ambulatory stalls once a room has six or more fixtures, and lavatories with 27 inches of knee clearance and a maximum 34-inch rim height, per the ADA Standards for Accessible Design.
What Are the Latest ADA Accessibility Standards?
The 2010 ADA Standards remain the current, active federal standard; there has been no superseding rewrite. Local jurisdictions do periodically update their adopted IBC and ANSI A117.1 editions, so the “latest” layer of requirements often comes from your local code cycle rather than a federal change.
How Many ADA Restrooms Do You Need?
Every toilet room in new construction must be accessible.
When Does the 20% Path-of-Travel Cost Cap Apply?
The cap applies when you alter a primary function area; your obligation to bring the path of travel, including restrooms, into compliance is capped at 20% of that alteration’s total cost, prioritized toward the highest-impact accessibility elements first.