
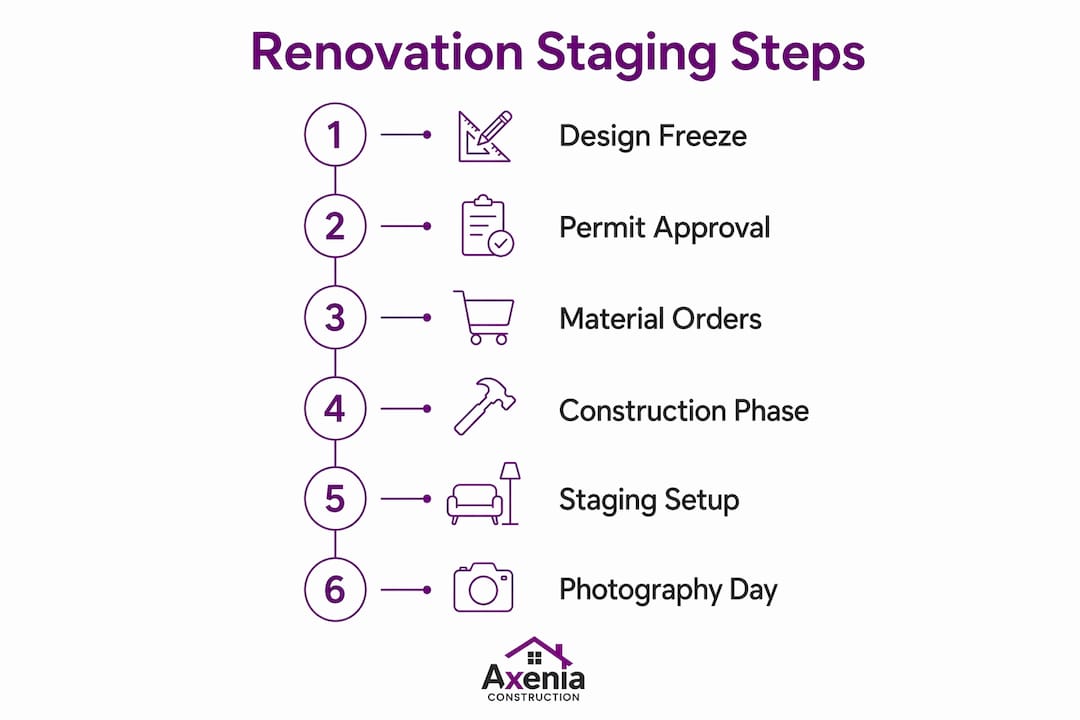
The whole home renovation staging process is the practice of timing staging tasks to renovation milestones so your home protects its value during construction and presents at its best when it counts. The single most important rule: freeze every design decision before demolition begins. Changes made on paper cost almost nothing. Changes made after framing or drywall require demolition and reconstruction, which carries a steep cost premium that can derail your budget and your timeline.
Here is what to expect at a high level:
- Design and planning: 4–12 weeks
- Permits and material ordering: 4–10 weeks (run concurrently when possible)
- Total project duration: 3–12 months depending on scope
- Long-lead items: cabinetry, windows and doors, and appliances have varying lead times often requiring early ordering
Axeniaconstruction guides homeowners through every one of these phases with milestone-based project management, transparent communication, and practical staging coordination built into the process from day one.
Table of Contents
- What does the whole home renovation staging process look like phase by phase?
- Which design decisions must you lock before construction starts?
- How do you protect your home and your sanity during construction?
- Your occupied-home show-ready checklist
- Should you renovate first or stage first?
- How do you coordinate your contractor, trades, and stager?
- What does a realistic renovation budget look like?
- What happens on staging and photography day?
- Key Takeaways
- The part of renovation staging most homeowners get wrong
- Ready to plan your whole-home renovation with Axeniaconstruction?
- Useful sources and Axeniaconstruction guides
What does the whole home renovation staging process look like phase by phase?
Every successful renovation follows a fixed sequence. Skipping or compressing any phase creates rework, code violations, or finish damage that costs far more than the time saved.
| Phase | Typical Duration | Key Staging and Prep Tasks |
|---|---|---|
| Design and planning | 4–12 weeks | Finalize layouts, fixtures, finishes; create design-freeze sheet |
| Permits and long-lead ordering | 4–10 weeks | Submit permits; order cabinets, windows, appliances simultaneously |
| Pre-construction logistics | short period | Move furniture to storage; install floor and door protection |
| Demolition | short period | Establish dust barriers; confirm off-limits zones |
| Structural and rough-in trades | several weeks | Protect remaining finishes; schedule inspections |
| Inspections | Milestone-gated | No staging work until each inspection passes |
| Insulation and drywall | short period | Begin sourcing staging furniture and decor |
| Finishes (flooring, cabinets, paint) | several weeks | Confirm stager and photographer bookings |
| Punch list | short period | Final cleaning, touch-up paint, hardware check |
| Staging and photography | few days | Install staging, shoot listing photos, prep for showings |
Lead-time callout: Order long-lead items the same week you submit for permits. Cabinetry commonly runs 6–12 weeks; windows and doors 8–14 weeks; appliances 4–10 weeks. A 20–30% schedule contingency protects you when suppliers slip.
- Confirm your contractor’s inspection schedule before booking the stager.
- Never schedule photography until the punch list is signed off.
- For room-level timing benchmarks, Axeniaconstruction’s renovation timeline examples offer detailed phase breakdowns.
Which design decisions must you lock before construction starts?
Every decision deferred from the design phase to construction creates a cost premium. The rule is simple: if it affects a wall, a floor, or a ceiling, decide it now.
Lock these before demolition:
- Floor plan and room layouts (wall removals, door swings, window placements)
- Plumbing fixture locations (moving a drain after rough-in is expensive)
- Electrical panel capacity, outlet locations, and lighting schedules
- Cabinetry dimensions and hardware selections
- Countertop material and edge profile (templates happen after cabinet install)
- Paint colors and sheen levels for every room
- Tile selections and grout colors
Changes after drywall mean cutting open finished walls, redoing rough-in work, and patching surfaces. That multiplier can turn a $500 design change into a $5,000 construction event. Use a simple Final Decision Sheet shared with your general contractor: list every item above, the selected specification, the supplier, and the date confirmed.
Pro Tip: Separate your “must-haves” from your “nice-to-haves” in writing before the freeze. Nice-to-haves that are not locked by permit submission get cut, not deferred. Deferring them mid-build is where scope creep begins.
How do you protect your home and your sanity during construction?
Practical protection during the build keeps staged elements intact and gives you a livable space if you choose to stay on-site.
Site protection measures:
- Ram Board or rosin paper on hardwood floors in traffic paths
- Cardboard and plastic film on stair treads and risings
- Temporary door protection panels on finished door frames
- Zip-wall plastic barriers between active construction zones and living areas
Storage decisions: Move furniture that cannot be protected to off-site storage before demolition. Short-term on-site storage works for items needed within 30 days; anything else belongs in a climate-controlled unit to prevent dust and humidity damage.
Living in a renovation safely:
- Establish a temporary kitchen with a countertop appliance, mini-fridge, and dedicated water source.
- Mark off-limits zones clearly with physical barriers, not just verbal agreements.
- Confirm your homeowner’s insurance covers renovation-related incidents before work begins.
- Protect HVAC returns with filters to prevent construction dust from circulating.
- Schedule a weekly cleanup with your contractor to keep shared areas presentable.
Your occupied-home show-ready checklist
Occupied-home staging succeeds when you adopt a show-ready mindset supported by a simple daily routine. Here is a room-by-room quick pass for high-traffic areas:
Entry: Clear shoes and bags, wipe the door handle, replace the mat if worn.
Kitchen: Clear counters to 80% empty, wipe surfaces, hide dish soap and sponges.
Primary bath: Fold or replace towels, clear the counter, close the toilet lid.
Living room: Fluff cushions, straighten throws, remove personal items from surfaces.
Timed routines:
- 5–10 minutes daily: The once-over pass above, every morning.
- 30 minutes before a showing: Add fresh flowers or greenery, open all blinds, turn on every light.
- 2–3 hours before photography: Full declutter, deep wipe-down, furniture placement check, scent reset.
Pro Tip: For photography, match all light bulbs to 2,700K–3,000K (soft white). Mismatched color temperatures look terrible in listing photos and are the easiest fix most homeowners skip. A subtle citrus or linen scent, not a plug-in air freshener, reads as clean and neutral to buyers.
Should you renovate first or stage first?
The answer depends on what is wrong with the home. Structural issues, failing systems, and safety deficiencies require renovation before any staging investment. Cosmetic issues are where staging earns its keep.
| Condition | Recommended Approach | Why |
|---|---|---|
| Structural or system failure | Renovate first | Staging cannot hide a failing roof or outdated electrical panel |
| Dated but functional finishes | Stage first or combo | Faster, reversible, lower risk |
| Vacant home in good condition | Vacant staging | Partial vacant staging runs $2,500–$5,500 install plus monthly rentals |
| Occupied home preparing to list | Occupied staging | Consultation $200–$500; partial occupied staging $400–$3,500 |
| $20K pre-listing budget | Combo play | Partial renovation on deal-breaker items plus staging for presentation |
For many sellers, the strongest pre-listing play is a mix of targeted renovation and staged presentation. Staging typically involves notable costs and can increase sale price; partial renovation can deliver larger gains but carries higher schedule risk. In a hot market where speed matters, staging wins on time. In a slower market, high-ROI renovation choices protect your asking price.
How do you coordinate your contractor, trades, and stager?
Coordination failures between trades and staging professionals are the most common cause of last-minute delays. Define roles and milestone handoffs before the project starts.
Who does what and when:
- General contractor: Manages the full sequence, pulls permits, coordinates all trades, owns the schedule.
- Trade leads (electrical, plumbing, HVAC): Engaged at rough-in; must complete and pass inspection before drywall closes walls.
- Professional stager: Book at permit approval; confirm availability again at drywall completion.
- Photographer: Book at punch-list start; shoot within 48 hours of staging install.
Questions to ask at each stage:
- At bid: What is your inspection schedule, and how do you handle failed inspections?
- Pre-construction: When do you need final material selections confirmed?
- Mid-build: Are we on track for the drywall completion date?
- Pre-staging: Is the punch list complete enough for the stager to work?
Milestone handoff sequence (Axeniaconstruction’s typical flow): Permit approval → long-lead items ordered → rough-in sign-off → drywall complete → final paint → flooring and cabinet install → punch list → stager in → photographer → listing live.
Axeniaconstruction’s project planning guide walks through each handoff in detail so nothing falls through the cracks.
What does a realistic renovation budget look like?
Budget discipline starts with the right contingency and ends with the right closeout paperwork.
| Budget Item | Guidance |
|---|---|
| Base construction budget | Scope-dependent; get three apples-to-apples bids |
| Contingency (standard) | 10–20% of base budget |
| Contingency (older homes) | 20–30% to cover hidden wiring, plumbing, or water damage |
| Staging costs (occupied) | Consultation $200–$500; partial occupied staging $400–$3,500 |
| Staging costs (vacant) | $2,500–$5,500 install plus monthly rental |
| Retainage at closeout | Retain 5–10% until final inspection and lien waivers collected |
Treat contingency as protection for discovery items, not a fund for upgrades. Old wiring, corroded plumbing, and hidden water damage are the real risks in older homes. Using contingency for a nicer countertop leaves you exposed if a real problem surfaces.
Payment schedule best practice:
- Tie every draw to a completed, inspected milestone, not a calendar date.
- Collect signed lien waivers from the general contractor and every subcontractor before releasing each payment.
- Hold retainage (5–10%) until the certificate of occupancy is issued and the final punch list is signed off.
For financing guidance, Axeniaconstruction’s renovation loan guide covers application steps and what lenders look for.
What happens on staging and photography day?
Staging day is the payoff for every decision made during planning. Protect it by treating it like a construction milestone.
Day-of checklist:
- Stager arrives first; confirm placement plan before movers unload.
- All construction touch-up paint must be dry 24 hours before staging install.
- Photographer arrives after staging is complete; allow 30 minutes for lighting setup.
- Open every blind and curtain; turn on all interior lights before the photographer walks in.
- Remove cars from the driveway; hide trash cans, pet items, and floor mats.
Photography tips for renovated homes: Shoot new finishes at angles that show depth (countertop edge profiles, tile patterns, hardware details). Before-and-after angles from the same position are compelling for marketing. Declutter aggressively for scale; a room with 20% fewer items photographs 30% larger.
Quick fixes to have on hand: touch-up paint in every finish color used, spare cabinet hardware, extra white towels and linens, a lint roller, and a small toolkit for any last-minute hardware tightening.
Pro Tip: Walk the home in the order a buyer would: front door, entry, living room, kitchen, primary suite, secondary rooms, bathrooms, outdoor spaces. Fix what you notice in that sequence, not room by room in isolation.
Key Takeaways
A successful whole home renovation staging process requires freezing design decisions before demolition, ordering long-lead items with permits, and coordinating stagers and photographers to milestone handoffs, not calendar guesses.
| Point | Details |
|---|---|
| Freeze design before demolition | Lock layouts, fixtures, and finishes before work starts to avoid costly demolition-and-rebuild rework. |
| Order long-lead items early | Cabinetry (6–12 weeks), windows and doors (8–14 weeks), and appliances (4–10 weeks) should be ordered at permit submission. |
| Carry realistic contingency | Budget 10–20% contingency for standard homes; 20–30% for older homes with hidden systems risk. |
| Use the daily once-over | A 5–10 minute show-ready routine for kitchens, baths, and entryways keeps an occupied home listing-ready. |
| Axeniaconstruction’s milestone approach | Axeniaconstruction manages permit-to-punch-list handoffs and staging coordination so homeowners avoid schedule gaps and last-minute surprises. |
The part of renovation staging most homeowners get wrong
Most homeowners treat staging as the last item on the list, something to think about after the punch list is signed. That mindset costs money and time. The stager needs to be booked at permit approval, not after drywall, because good stagers in competitive markets fill their calendars weeks out. Miss that window and you are either waiting or settling.
There is also a persistent belief that a beautifully renovated home sells itself. It does not. Buyers need to see themselves in the space, and raw new finishes without furniture and context read as cold and hard to scale. Staging after renovation is not decoration; it is the final layer of the construction sequence. Treat it that way.
The other thing worth saying plainly: the 80/20 combo of targeted renovation plus staged presentation consistently outperforms either approach alone in most U.S. markets. Spending everything on renovation and nothing on presentation leaves value on the table. Spending everything on staging while ignoring a failing HVAC system or outdated electrical panel creates buyer anxiety that no amount of throw pillows can fix. The balance is the strategy.
Ready to plan your whole-home renovation with Axeniaconstruction?
Axeniaconstruction is a licensed, women-owned general contractor in Rockville, MD, offering design-build services, general contracting, milestone-based project management, and staging coordination for residential renovations across the DC, MD, and VA region. We handle the full sequence from scope freeze and permit submission through punch list closeout and photography prep, so you are never left guessing what comes next.

When you contact us, here is what to expect: an initial consultation to define scope and priorities, a written milestone plan tied to your budget and timeline, and transparent communication at every phase handoff. Bring your wish list, your must-haves, and your budget range. We will help you build a plan that protects your investment and gets your home to market ready.
Explore our home renovation services or read our foundational guide on residential renovation to understand the full scope of what a whole-home project involves. When you are ready to talk, reach out directly through our contact page.
Useful sources and Axeniaconstruction guides
- How long does a home remodel take? A step-by-step timeline — phase durations and schedule contingency guidance
- How to Plan a Home Remodel: Phase-by-Phase Guide — design freeze, long-lead ordering, retainage, and lien waivers
- Stage your home vs renovate before listing — ROI comparison and the $20K combo play
- A handy seller’s guide to staging a house while living in it — occupied-home staging routines and once-over checklists
- NAHB: Thinking About Home Remodeling? Start Here — foundational homeowner guidance from the National Association of Home Builders
Axeniaconstruction guides:
- What Is Whole Home Renovation? A Homeowner’s Guide
- Home Renovation Project Planning Guide for Homeowners
- Home Renovation Contract Review Guide for DC, MD, and VA
- Kitchen Renovation Phases Explained: A Homeowner’s Guide