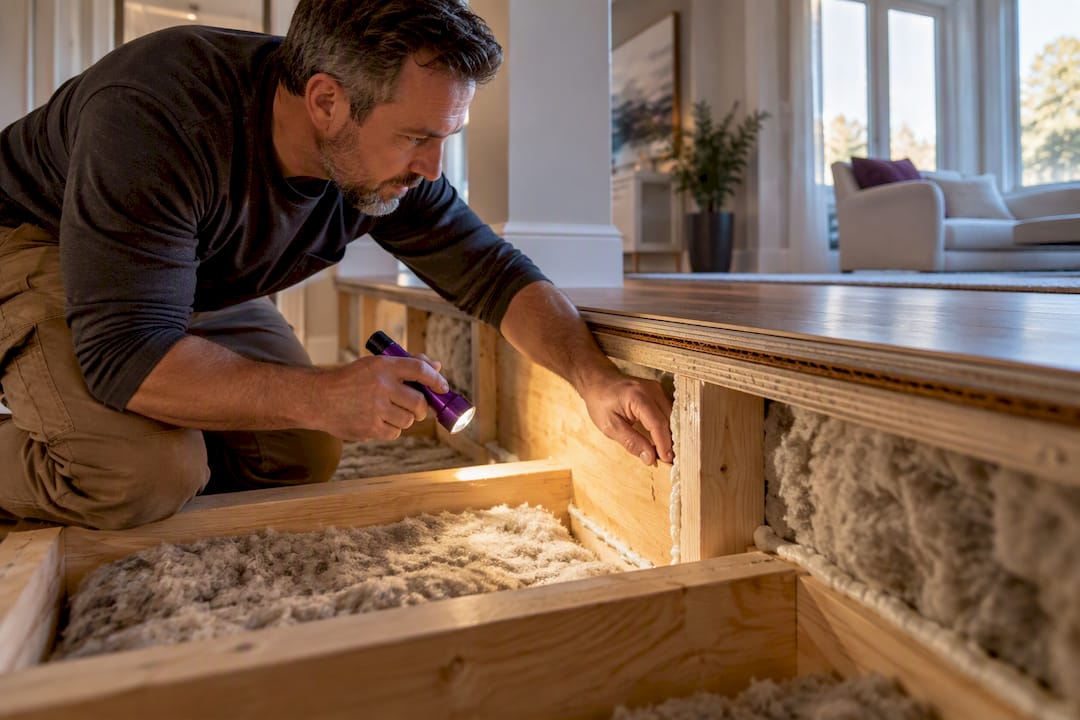
For the quickest, most reliable reduction of noise between floors, focus on stopping impact at the surface and sealing flanking paths: add resilient underlayment or a floating subfloor for footstep noise, add mass and damping for airborne noise, and seal gaps at the rim joist and around penetrations. Retrofits work within the limits of your existing structure, while new builds can hit higher STC and IIC targets from the start. Structural changes or fire-rated ceiling work call for a licensed contractor, and a site visit from a team like Axenia Construction can tell you which fixes your floor actually needs.
TL;DR:
- Sealing flanking paths at the rim joist, penetrations, and edges is essential to prevent sound leakage, especially in retrofit scenarios.
- Decoupling impact noise requires floating subfloors, resilient channels, or sound mats, which are most effective for footstep and impact sounds.
- Damping compounds like Green Glue target airborne noise and structure-borne resonance but offer limited benefits when used alone.
- Installing additional mass, such as drywall or underlayment, can significantly improve both STC and IIC ratings when done correctly.
- For complex or structural issues, hiring a licensed contractor ensures proper sealing, installation, and compliance with fire-rated assemblies.
Table of Contents
- How sound moves through your floor-ceiling assembly
- Which fix matches which noise: decoupling, damping, mass, and absorption
- Choosing materials: underlayments, mats, insulation, and sealants
- A retrofit checklist: diagnose first, then work from least to most invasive
- When to bring in a licensed contractor
- What years of floor projects teach you about noise complaints
- How Axenia Construction helps with floor sound control
- Sources
- FAQ
How sound moves through your floor-ceiling assembly
Two very different problems get lumped together under “noise between floors,” and knowing which one you have changes everything about the fix. Airborne noise is voices, television audio, and music, sound that travels through the air and sets the floor-ceiling assembly vibrating. Impact noise is footsteps, dropped objects, and dragged furniture, energy that enters the structure directly and radiates from the ceiling below. A thick rug muffles impact noise fairly well but does almost nothing for a bass-heavy movie playing downstairs, because the two travel through the building in different ways.
Sound also does not stay put where it enters. It travels along what acousticians call flanking paths, the rim joist at the perimeter of the floor, plumbing and electrical penetrations, and gaps around the edges where the subfloor meets exterior walls. You can install an excellent isolation system in the middle of a room and still hear plenty of noise if the perimeter is not sealed, because sound finds the path of least resistance.
- Airborne noise moves through air and structure as vibration, common sources include TVs, speakers, and conversation.
- Impact noise enters directly from contact with the floor, common sources include footsteps, dropped items, and dragging chairs.
- Flanking paths let sound bypass an otherwise well-treated floor through rim joists, pipe penetrations, and unsealed perimeters.
Two ratings describe how well an assembly resists these two noise types. Sound Transmission Class (STC) rates resistance to airborne noise, while Impact Insulation Class (IIC) rates resistance to impact noise, and both are defined in long-standing federal guidance on airborne and impact noise control in dwellings, which also identifies mass, damping, decoupling, and the elimination of leaks as the physical factors that most affect performance. The International Building Code includes minimum STC and IIC thresholds for dwelling separations, and those numbers describe lab-tested assemblies, not necessarily what ends up installed in your house. Field results usually run lower than lab ratings because real installations have doors, ducts, electrical boxes, and imperfect sealing that a test lab does not. That gap is exactly why workmanship, correct screw lengths, continuous sealing, and an unbroken air barrier at the perimeter often matter more than which product you buy.
Which fix matches which noise: decoupling, damping, mass, and absorption
Once you know whether you are fighting impact noise, airborne noise, or both, the next step is matching the method to the problem instead of throwing every product at it.
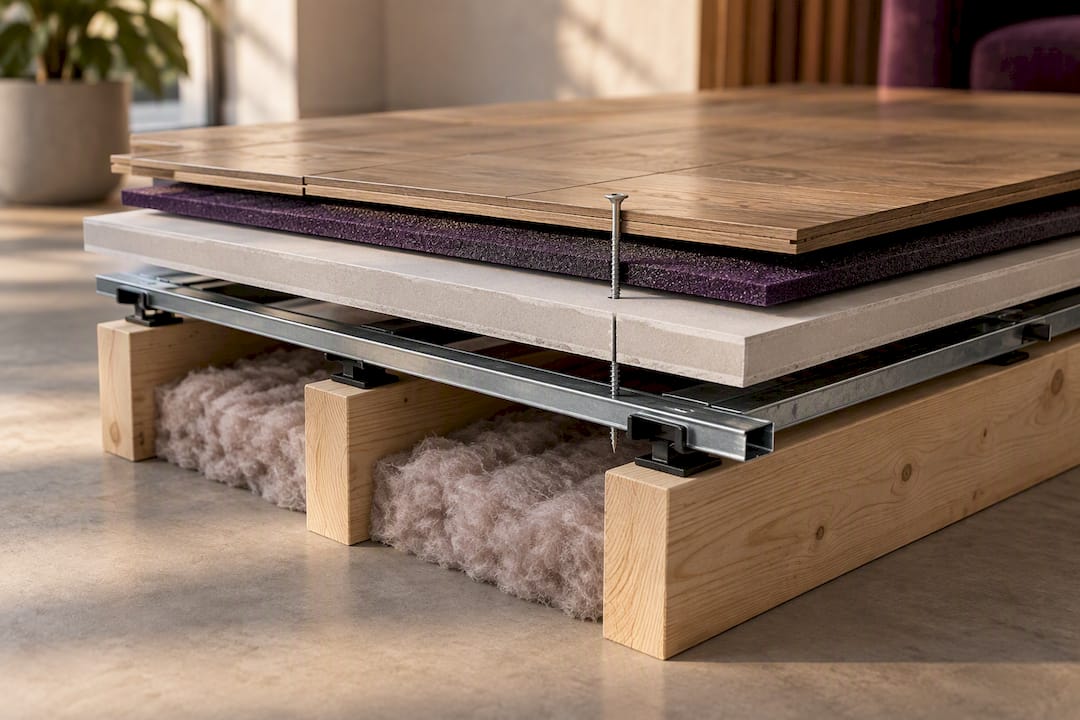
- Decoupling breaks the physical connection between the finish floor and the structural framing, so footstep energy has nowhere direct to travel. A floating subfloor, resilient channels, or a sound isolation mat all decouple in different ways and at different costs, and they are the most effective category for impact noise specifically.
- Damping converts vibration into small amounts of heat instead of letting it radiate as sound. Viscoelastic damping compounds sandwiched between two layers of drywall, sold under names like Green Glue, work this way and help most with airborne noise and structure-borne resonance.
- Adding mass makes the whole assembly harder to set vibrating in the first place. Gypsum underlayment poured over a sound mat, or an added layer of drywall on the ceiling below, increases mass and improves both STC and IIC when installed correctly.
- Absorption uses mineral wool or fiberglass batts inside the joist cavity to soak up sound energy that does get through the structure, reducing what reaches the room below, particularly for mid and high frequencies.
Sealing belongs alongside all four, since none of these methods deliver their rated performance if sound can flank around the edges through an unsealed rim joist or an open penetration; understanding drywall tape types and uses for seamless finishes is key to ensuring airtight seals and acoustic performance (Understanding drywall tape: types and uses for seamless finishes).
Each method comes with tradeoffs. Floating subfloors and thick gypsum pours deliver the biggest gains but add floor height, sometimes an inch or more, which matters at doorways and stair transitions. Resilient channels are less invasive but fail completely if a single screw penetrates through to the joist, a mistake experienced installers watch for closely. Damping compounds and absorption are the least disruptive but also the most limited on their own. According to the Construction Specifier’s analysis of IIC ratings, a layered approach that seals first and adds isolation only where needed tends to beat spending the whole budget on one premium mat.
Pro Tip: Before buying any product, identify whether your complaint is footsteps, voices, or both. That decision alone rules out half the options on the shelf.
Choosing materials: underlayments, mats, insulation, and sealants
Material choice matters less than where and how each material is installed, but a few classes come up in nearly every retrofit.
- Resilient underlayments and sound mats go directly on top of the existing subfloor, beneath the finish floor or a gypsum pour, and handle much of the decoupling work.
- Mineral wool or fiberglass batts fill the joist cavity from below, adding absorption without changing floor height at all.
- Acoustical sealant and caulk close gaps at the perimeter, around pipes, and at electrical boxes, stopping flanking paths that would otherwise undercut everything else.
- Spray foam at the rim joist creates what building scientists call a critical seal, closing the junction between the rim joist, sill plate, and subfloor in one continuous pass.
Installation depth and hardware choice change outcomes more than brand names do. Manufacturer guidance on fire and sound design in multifamily floors cites a gypsum pour of a moderate minimum thickness over a sound mat, with thicker pours or higher-density mats improving performance further at the cost of added weight and cure time. That same guidance flags screws that penetrate through resilient channels into the framing as one of the most frequent installation errors, one that can undo five to ten STC or IIC points of performance no matter how good the material underneath is. Fire-rated assemblies add another layer of constraint, since a UL-tested design specifies exact materials, thicknesses, and fastener patterns, and swapping in a different mat or a thinner pour can invalidate the fire rating along with the acoustic one.
The BSC information sheet on the rim-joist critical seal notes that spray foam at this junction reduces air leakage and closes a common flanking path, though the choice between closed-cell and open-cell foam depends on climate and condensation risk. When you read a manufacturer’s published STC or IIC number, treat it as a ceiling for what the assembly can achieve under ideal lab conditions, not a promise for your specific house.
A retrofit checklist: diagnose first, then work from least to most invasive
Start by figuring out what you are actually dealing with before spending a dollar on materials.
- Diagnose the noise type. Stand in the room below during known activity upstairs. Sharp thuds and footfalls point to impact noise; music and voices point to airborne noise, and most homes have some of both.
- Locate flanking paths. Check the rim joist area, recessed lighting, plumbing penetrations, and any gap where the floor meets an exterior wall, since these often leak more sound than the field of the floor itself.
- Seal first. Acoustical caulk at penetrations and perimeters is inexpensive and can be done in a weekend, often with noticeable results before anything else changes.
- Add soft floor coverings. Rugs, pads, and carpet reduce impact noise substantially and cost little, though they will not touch airborne noise from a home theater.
- Install underlayment or a sound mat under the finish floor. This step requires pulling up the existing floor and typically takes several days, with cost varying widely by square footage and material grade.
- Consider ceiling isolation or a floating subfloor only if steps one through five fall short. This is the most invasive and expensive option, often adding a week or more and requiring drywall removal or floor height changes.
Costs for these steps vary enormously by region, floor size, and existing conditions, so treat any number you see online as a rough starting point rather than a quote. Once a project involves removing ceiling drywall, altering a fire-rated assembly, or floating an entire subfloor, permits and code compliance usually come into play, and that is the point where a licensed general contractor should take over rather than a weekend project.
When to bring in a licensed contractor
Some fixes are well within reach for a handy homeowner, sealing gaps and swapping underlayment among them. Others cross into territory where a mistake costs more than it saves.
- Structural changes to joists, subfloor, or load paths need an engineer’s or contractor’s sign-off, not a guess.
- Fire-rated ceiling assemblies must match a tested UL design exactly, since substituting materials can void the rating.
- Whole-floor floating subfloor installs involve enough labor and sequencing that professional project management pays for itself.
When you interview bidders, ask about their licensing, whether they can show references for similar acoustic work, and whether they understand IIC and STC assembly requirements, RC-1 resilient channel screw rules, and proper sealing practice at the rim joist. A contractor who cannot answer those questions clearly is not the one to trust with a fire-rated ceiling. A licensed, women-owned general contractor can offer assessment services for floor sound control and home renovations.
Pro Tip: Ask any bidder to walk you through exactly how they will seal the rim joist and perimeter, not just what mat or underlayment they plan to install.
What years of floor projects teach you about noise complaints
The biggest surprise in this work is how often an expensive mat underperforms because of a missed detail: a screw that clips a resilient channel, a perimeter left unsealed, a rim joist skipped during insulation. Spend your first dollars on sealing and correct installation, then upgrade materials if you still need more.
— Arienne
How Axenia Construction helps with floor sound control
If you have worked through sealing and underlayment and still hear the upstairs neighbor’s every step, a site visit settles the question fast. A general contracting team can assess your specific floor-ceiling assembly, identify flanking paths you might miss on your own, and scope a fix that fits your budget and timeline, whether that means a targeted underlayment swap or a full home renovation.

A consultation typically covers a site assessment, a review of your goals and floor structure, and a written scope and estimate before any work begins. For homeowners planning a broader renovation alongside the acoustic work, our home renovations team can fold floor sound control into the larger project from day one. Reach out through our general contracting page to schedule a site visit.
Sources
- Fire and sound in multifamily floors – design considerations (IG1995)
- NIST/NBS guidance on airborne and impact noise control in dwellings
- BSC information sheet: Critical seal (spray foam at rim joist)
FAQ
How do I reduce footstep noise from upstairs?
Footstep noise responds best to decoupling and mass: soft floor coverings help immediately, and a resilient underlayment or sound mat under the finish floor delivers a bigger, more lasting reduction. Sealing the perimeter and any penetrations prevents the sound from flanking around whatever isolation you install.
How can I prevent sound from traveling between floors in my house?
Address both noise types together by decoupling the floor for impact noise and adding mass or damping compound for airborne noise, then seal every flanking path including the rim joist and penetrations. The BSC critical seal detail at the rim joist closes one of the most commonly missed gaps.
How can I make my house soundproof between the upstairs and downstairs?
No retrofit makes a floor completely silent, but a layered approach, sealing first, then soft coverings, then underlayment or a mat, then ceiling isolation if needed, gets most homes to a noticeably quieter result. Structural or fire-rated changes at this stage are best handled by a licensed contractor.
How can I soundproof my second-floor apartment?
Renters usually cannot alter the structure, so focus on what is reversible: thick rugs and pads for impact noise, and a portable sound mat under an area rug where available. For anything involving the ceiling or subfloor, check with the building owner or property manager before starting work.